

Introduction
For most modelers, the track plan is the hardest part of building your layout or module. The second hardest part is getting that track plan from design to benchwork.
This is a two-part series on a modern approach for getting your Track Plan from your computer onto your benchwork and ready for laying track.
I assume at this point that you already have your track plan created, and you are now wondering how you will get your grand ideas onto your benchwork.
Part 1 will cover printing at full-scale and testing various methods of attaching your printout.
Note: This is a great time to lay your printed track on your benchwork for a visual test. This is also a great time to grab some rolling stock and building footprints, play around on the printout, and see how things will fit and see if it matches your expectations.
Part 2 will cover preparing your printout and foam, cutting out white space, alignment, precautions of spray glue, and gluing down your track plan.
The pursuit of a better way
In pursuing a better way to get my track plan from paper to benchwork, I ran across videos where modelers glued prints directly to the benchwork. I thought this was a great idea, but I wondered why this was not a common practice. As it’s no surprise, many modelers are not fond of change. As history has proved over and over in this industry, change does take quite a while to be adopted mainstream.
But that’s not me, and it has never been! Quick story. A modeler here in Texas operated on my layout in Colorado Springs over 20 years ago through an event called RockyOp (a weekend event of personal layouts). He mentioned the other day that the one thing that stood out was I had placed my helix free-standing in the middle of the room—something he hadn’t seen before. Today it is commonplace, and even as I write this, he is building his helix in the middle of the room. The moral of the story is never be afraid of trying something different!
That said, I contacted Ondrew over at Model Railroad Benchwork. Ondrew has over 60 benchwork builds under his belt and does glue his track plans to the benchwork before delivering them to clients. While he glues direct to plywood, during the conversation, his suggestion for gluing directly to foam was, “I suggest buying a small piece of foam board and testing your planned Method of securing track to see if it works. leave it sit for at least a week before you try any destructive tests as that gives the glues time to fully bond and cure.”
So that was exactly what I did!
Printing full-size prints for less than $20 bucks
If you made it this far, I will assume that you have designed a Track Plan and have it in a digital format. If you don’t already have a scale on your drawing, add one. All “true” CAD programs let you export at full scale (1:1). Not all model railroading track design software will export 1:1; mine does not. If your’s does, skip to Self-Service Printing.
My Process
I use RailModeler, which is not a true CAD program and only exports an image. The saving grace is that when I zoom into the canvas, that “view” is supported in the export. I set my canvas to 235% for my track plan and export, giving me a 1:1 JPG image.
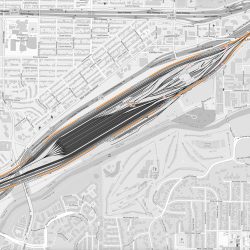
Self-Service Printing
My layout is 120″ x 125″ around the room with 24″ deep sections, making my longest print 120″ by 24″. I checked around a couple of different “full-service” printing companies it was going to cost me about $60 per section, but each section would have to be printed in two parts – not ideal. To be fair, I recently found one that would print 120″ on one page, but it was $198 – again, not ideal.
More research brought up FedEx Printing services, specifically their Self-Service Blueprint printer. A phone call revealed that their Blueprint Printer is fed by 24″ and 36″ rolled paper. The FedEx states, “Print up to 36″ in width,” but nowhere did it say what length. Time for a Test!! With my file on a USB Drive and plugged into the printer, I followed the screen prompts and let her rip. Within 5 minutes and an $18.36 charge on my credit card, I have a full-length print of my west wall.


The tests, foam, paper, and three types of glue
The recommended glue for plywood was 3M 45, which seems very difficult to find. More research and I settled on 3M 90, 3M 77, and the proverbial Elmers Glue.
I cut up some strips from a sample, picked a scrap piece of foam, and started the gluing process. I left enough space for a control section – track to foam.
Right off the bat, I noticed the 3M 90 melted the foam – so it’s out.
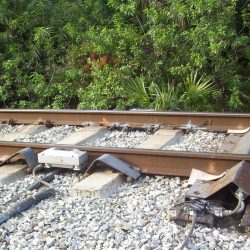
After a week of curing, I laid cork bed on the remaining two test strips and the Control section with Liquid Nail. After 24 hours, I added the Flex Track and let the test sample cure for another week.
For testing, I used a digital hand scale and chose two pull tests, a sideways pull test and a vertical pull test.
Sideways Pull to Fail Test Results:
- Control: 247 oz (15.4 lbs)
- Elmers Glue: 221 oz (13.8 lbs)
- 3M 77: 200 oz (12.5 lbs)
Note: All three failures were due to the rail separating from the plastic ties, not a failure in the paper.
Vertical Pull to Fail Test Results:
- Control: 84 oz (5.25 lbs)
- Elmers Glue: 116 oz (7.25 lbs)
- 3M 77: 110 oz (6.9 lbs)
Note: The Control and 3M 77 failed at the scale hook, while the Emlers Glue sample came COMPLETELY off the foam. It did not tear the paper, the whole test sample came off.
For the last test, I needed to know one more thing. If I needed to make a change, could I get the track off the foam without trashing the foam? Using a putty knife, I carefully remove the track and roadbed from the foam without damaging the foam.


Conclusion:
The 3M 77 and paper are just as solid as gluing directly to the foam. The fact that the 3M is waterproof means it will not be affected when laying ballast and scenery.
Now I know everyone will have an opinion about this, which is great! Please be nice and respectful, so I don’t have to delete your comment!


I did essentially the same thing with Railmodeller. I printed out the whole track plan on 8 1/2 x 11 printer paper and taped them all together in one big sheet and placed it on the 1” foam on my 5 x 9 table. I then used my wife’s sewing tool, a little round spiked sprocket like wheel to poke holes through the paper and into the foam leaving a marking on the foam of the centerline of all the tracks. I then glued cork roadbed using liquid nails and after 2 days of drying glued Atlas flex track to the cork roadbed. Worked really well. I’d do it again that wau.